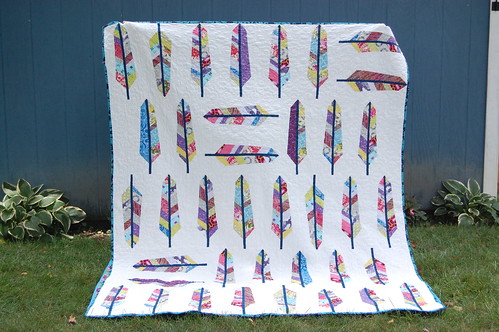
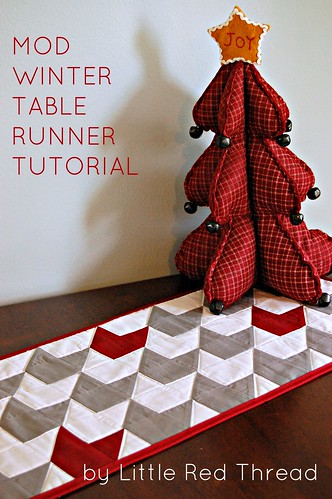
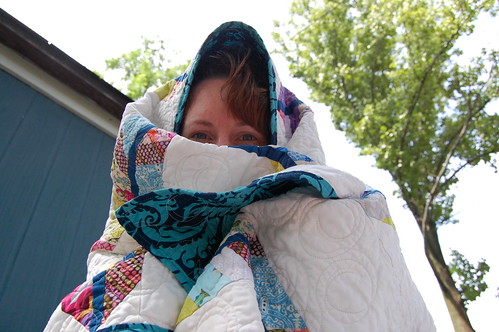
I'm super excited to show you something I've been hard at work on for the last few weeks. Here is my very first quilting tutorial for
Lupin's Holiday Blog Hop! I am thrilled to be able to put something together for everyone to make and enjoy thru the long dreary Winter days. It's also my first pattern under my new name Little Red Thread.
Skill Level: Advanced Beginner / Intermediate
Finished size: 12" x 43"
Supplies
Fabric:
- 1 yd of white
- 1/2 yd of gray
- 3/8 yd of scarlet or deep red (accent chevrons and binding)
- 1/2 yd of cotton batting or 1 package of craft size cotton batting
*Note: you'll have some extra fabric left over in case of any "oops!" moments :)
Misc:
- rotary cutter, cutting mat, 12" acrylic ruler, thread, scissors, fabric marking pen, straight pins, safety pins, an iron with steam setting
Nice to have:
- labels/ Post-it notes
- spray starch or pressing spray
---------------
Cutting
(WOF = Width of Fabric)
Hint: Use one of your labels or Post-it notes to put on top of each of your cut stack of squares so you don't mix up the sizes.
White: cut (2) 2 7/8" strips the WOF. From these strips cut (33) 2 7/8" squares
cut (2) 2 1/2" strip the WOF. From this strip cut (33) 2 1/2" squares
*set aside your remaining white for the backing*
Gray: cut (2) 2 7/8" strips the WOF. From these strips cut (28) 2 7/8" squares
cut (2) 2 1/2" strip the WOF. From this strip cut (28) 2 1/2" squares
Red: cut (1) 2 7/8" x 18" strip. From this strip cut (5) 2 7/8" squares
cut (1) 2 1/2" x 18" strip. From this strip cut (5) 2 1/2" squares
Binding: cut (4) 2 1/4" strip the WOF out of your red fabric
---------------
1/2 Square Triangle Units
1) Take one of your 2 7/8" white squares (if you're using a print turn it to the wrong side of the fabric). Draw a line down the center from point to point. Do this on all of your 2 7/8" white squares.
2) Match one of your 2 7/8" white squares and a 2 7/8" gray square (right sides together if you're using a print) with the white on top. Sew 1/4" from the drawn center line on
both sides. Continue sewing until you've used all your gray 2 7/8" gray squares.

Tip: Try chain piecing your squares together for faster sewing!

3) Match the remaining 2 7/8" white squares with the (5) 2 7/8" red squares wrong sides together with the white on top. Sew 1/4" from the drawn center line on both sides.
4) Cut each square in half using the center line that you drew earlier as your guide

5) Open each cut unit and using your iron on the cotton setting press, using steam, your seam towards the darker fabric. You now have a completed 1/2 square triangle! Continue pressing the remaining units.
6) Cut your "dog ears". These are the little piece of fabric that stick out at the ends of your 1/2 square triangles.

Tip: This is a nice task to do in front of the tv as it's kind of mindless work.
Block Assembly
Reference the picture below to see how to set your pieces out to form the basic layout:

7) Lay out one gray and white 1/2 square triangle unit and one solid white 2 1/2" square beside it. Lay out one solid gray 2 1/2" block and one gray and white 1/2 square
triangle unit beside it.

Sew units together using 1/4" seam. Open the sewn units and press seam toward the
solid block.

10) Join the two pieces together making sure to "nest" your center seam. Pin and sew using a 1/4" seam.


11) Open your sewn block and finger press the center seam (the one you just sewed) open. Then press the seam open using your iron. If you haven't already been using spray starch or pressing spray, it's very helpful, especially at this point, in keeping your block nice and crisp.

You now have a completed block!

Repeat steps 7-10 to complete the remaining blocks. For the red chevron blocks make sure to use your red and white 1/2 square triangle units when putting them together ;)
Finished size should be 4 1/2" square, but if not, don't fret!
Squaring up: While some blocks may come out perfectly others may end up a bit "off". If this happens you can square up each side of your block by taking off a teeny tiny sliver from each side. With my blocks there were just a few spots that needed to be cut straight again.


You do want to be very careful with how much you trim off as you may lose your points at the tips of your chevron block. Ideally, you want all of your blocks to be as identical in size as possible.
Row Assembly
12) Lay out your blocks working
left to right in the pattern shown in the picture to form your rows.
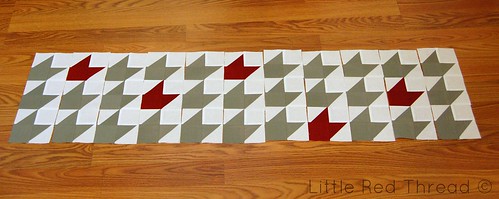
Make sure each of your chevron blocks are facing the same direction as you go.
13) Gather up 3 of your completed blocks from Row 1. Pin and sew the finished blocks together using a 1/4" seam making sure your center seams are aligned.


Set your completed row back into your layout and move to the next row, Row 2, until all 11 rows have been completed.
14) Press Row 1's seams up towards the top of your runner. Press Row 2's seams towards the bottom of the runner. Odd numbered Row seams are pressed up, even numbered Row seams are pressed down. Continue pressing all remaining rows in this manner.

Hint: Pressing your seams in alternating directions helps them to nest together and to reduce overall bulk helping your runner to lay nice and flat.
15) Pin and sew pressed Rows together working left to right.


Press these seams
open.
Hint: Pin your rows together starting in the center, lining up your seams there, and working out to the ends.
The runner top is complete! Yay!
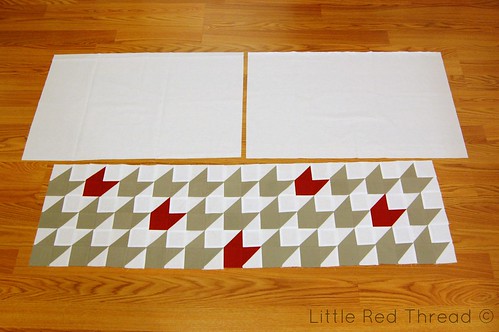
Backing
16) Using your remaining white fabric cut (2) 16" x 25" pieces. Sew these two pieces together on the short sides, the 16" side using a 1/4" seam. Press open.
 Quilt Sandwich
17) Spread your batting out and give it a quick iron to smooth out any crazy wrinkles if needed. Lay your runner top over your batting and gently smooth it out making sure all your seams are laying flat and you don't have any weird puckers or fabric flipped under. Go ahead and trim your batting within an inch of your runner top.
18) Lay your white backing fabric on your work top or the floor (right side down if you're working with a print), then center your batting and runner top over your backing. Smooth out any wrinkles.

19) Baste all three layers together using your safety pins.

Hint: I used my curved safety pins for basting and it saves my fingers so much pain. You can usually find these at any quilting or craft store along with the snazzy colorful pin grips.
Here's a little post about them if you're curious.
20) Quilt it! I quilted mine in the white space between the chevrons and followed the chevron shape. This made for a pretty neat mirror image on the backside. I used a big stitch length, 3.0, for my quilting which made it show up more.
Once you're done quilting go ahead and trim off all the excess batting and backing to the size of your top.
Binding
20) Take two of your red binding strips and lay them at a 90 degree angle with right sides together.
Draw a diagonal line from corner to corner. Pin on either side of the line and then sew straight down the line.

Cut off the excess fabric within a 1/4" of your sewn line.

Find the end of your binding strip and add another strip using the method above until all 4 strips have been added. Make sure your have right sides together and that your strips are not twisted.
While it's nice to have things in writing it often easier to see it done and if you've never done binding before it can be a bit intimidating. Missouri Star Quilt has an excellent tutorial on how to do binding from start to finish. While some of their techniques are different than what I've been taught, the end result and the overall method are the same.
Now you're done!
I hope you had fun making your Mod Winter Table Runner!
Quick tips for caring for your new table runner:
- Spot clean with soap and mild detergent when possible.
.png)