Sunday, March 25, 2012

Pressing vs. Ironing

In my world of hard to break habits lies the mysterious world of ironing.
To explain I mean I have a tendency to want to iron my fabric, my seams, and my finished blocks instead of pressing them.

This is what happens when you iron a seam instead of pressing it.

What happens when you iron instead of 
press

Because I forgot to press my seams (I ironed instead) I stretched out my fabrics.  When I sewed the block together I noticed that I had created what are called pin tucks.  Pin tucks happen when you stretch fabric to make it match another piece.  It's very tempting to stretch block pieces so they'll fit perfectly but resist!
One stretched seam amplifies itself many times over, ironing will aggravate it even more.


What's the difference?
When you iron something, anything really, you're essentially pulling and stretching the fibers of the fabric with a hot and somewhat heavy piece of metal.  You're attempting to physically, and hopefully gently, stretch out any wrinkles in said fibers.

When you press something you are attempting to create a "wrinkle" or a seam in your fabric.  Pressing also, as the word implies, does not involve pushing, pulling or stretching fibers.  Permanent pressing involves lots of steam to "set" the seam.

When you're piecing together a quilt block you'll often see that the directions will tell you to PRESS open a seam or to PRESS a seam in one direction or towards another seam.  Pressing and ironing are two different methods and should never be treated as the same thing.

Wednesday, March 21, 2012

G.I.A.

I'm going to be a bit G.I.A. this week.
"Gardener In Action"

Narcissus Tete-a-tete

The warm weather and thrown me outside to make sure my garden beds are turned under,
flowers are staked, lawn is mowed and the bird feeders are full.  I can't believe we JUST had our first grass mowing of the year.  In Ohio it's still a rare thing to mow in March, don't usually have to bust out the equipment till late April.
Also it's sad to see the daffodils that normally last nearly a month go from looking uber cute to droppy and spent in under 2 weeks.  I don't care what anyone says, even if the weather IS exceptionally pleasant be careful what you wish for.  All this warm weather is certainly setting us up for a longer allergy season, more bugs and more weeds.

I still wonder how the maple syrup harvesters in our area managed this year.  I can't imagine the syrup was running high or tasty since we had no hard freeze with a mild thaw.  Booo to that because I love me some maple syrup.
The honey supply should be on the upswing though!

The only good thing I can think of is that we may have a longer than normal growing season. That fact should bode well for most small scale farmers and backyard gardeners.  In fact our rain barrel is hooked up for the season already.  It will mean more land management for large scale operations though which means more weed control chemicals and water used for irrigation should this heat continue to build thru summer :(

It's a give and take kinda year methinks.

Saturday, March 17, 2012

Bags

The weather has been undeniably gorgeous this week.
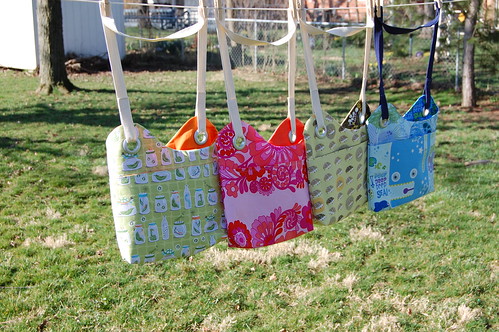
So before I detain you any longer from enjoying the warmth and sun here are the finished bags for Craft for Hope's Project #16

Bags

The Whale & the Hedgehog

Flowers & Bugs

Craft for Hope #16

I love all the fabrics I used for these bags, but most especially the Hedgehog & Leaf combo and the Firey Pink and Orange Flower combo.
Chris asked me after I finished taking these photos if I had made one for myself.
Of course I hadn't, but I'll probably add one to my To-Make List now.

Enjoy the weekend!!

p.s. Remember you can find the pattern for this bag in Betz White's Craftsy shop: http://www.craftsy.com/pattern/sewing/Accessory/Sidekick-Sling-Bag/3181

Thursday, March 15, 2012

Pattern Review: Sidekick Sling Bag by Betz White (part 2)

Part 2
*A bit late due to my dates being mixed up on the post-ahead schedule, apologies.*
You can catch up on Part 1 here.
As you may recall I had just finished sewing the exterior portion of the bag together.
There may be an easier way to "square off" your corners but the way Betz describes how to do it is easy enough.  If you're nervous about cutting into your bag I always encourage practicing on a a bit of scrap fabric to see if you've go it down.

sidekick pattern_9
(The seams should line up, but don't kick yourself if they don't match perfectly it takes practice!)
This method is also used on the interior portion of the bag so all bag parts have a nice flat bottom.
It also gives a professional finished look to the bag doing it this way ^_^

You're almost in the homestretch at this point.

sidekick pattern_10
(stuffing it all together)
It may seem counter-intuitive to do it this way but keep with it.


Tuesday, March 13, 2012

Pattern Review: Sidekick Sling Bag by Betz White (part 1)

I purchased this pattern to make bags to donate to Craft for Hope's Project #16: Bags & Beanies for kids receiving cancer treatment in MN.

Here's how I thought her pattern measured up on my very first try.

 The pattern comes with clear instructions on materials needed, fabric suggestions, a basic stitch guide, and other intuitive info that are helpful when sewing this bag.
It has just two pieces that need added to a template you can make yourself like I did.
I used some scrap printer paper and added the curved pieces to the top making sure to mark one side FRONT/exterior and the backside BACK/interior.  You can use freezer paper or even parchment paper.
She warns against flipping the pattern and at first I wasn't sure why.  It later becomes apparent that you are creating identical pieces that will mirror each other.
Trust me, don't flip your pattern till she says too :)

If you're working with a print, like I was, make sure you can line up evenly the pattern you want visible on the bag.  No half-severed fishes here!

sidekick pattern_2

You can either pin your pattern or...

sidekick pattern_3

hold it down and trace around it with a fabric pen.
I found tracing around the pattern to be faster and easier to cut out than leaving the pattern pinned into the fabric.


Betz's pattern calls for 3/4 yards of both Main and Interior fabric.  This is MORE than enough fabric to account for a boo-boo or two so don't fret if you have a bad cut.  Sometimes patterns call for just enough fabric while others leave room for error.  Use good judgement, measure twice and cut carefully!

Saturday, March 10, 2012

Aren't you glad?

It's getting on to that time of year.  The one where I'll mysteriously disappear at regular intervals to check my flowers, dig in the dirt, and generally soak up some long overdue sun.

Aren't you glad?

I nearly forgot what the sun looked like this Winter.
We were looking forward to trying to catch some of the Northern Lights from the massive solar flare on Thursday but it seems that there's just too much light pollution around our area.  Fortunately it's not enough to blot out the stars, but I'm sad to have missed such a rare photo opportunity.
 
However, I have some wonderful things to post up next week: a pattern review, some shots of my new peonies in their "baby" stage and if there's time another quick quilting tip.

Inside

Remember to get outside and enjoy the fresh air this weekend!

Wednesday, March 7, 2012

1 + 2 = 3

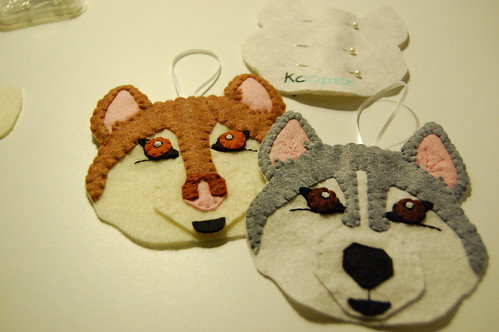
These dogs are nearing completion.  
I can't begin to describe how much work creating these patterns were.  Both the Huskies (top) and the Kooiker (bottom) were full faced designs from scratch and doing brand new full faces means the amount of detail and time is tripled.  I do think I can iron out the time needed to make them, but when it comes down to it I need to keep in mind that my time is valuable. It's my skill that helps pay the bills.
Khole Ann & Kooper

All 3 of these ornaments are HUGE compared to my others and need to be scaled back imo. They measure in at 5 in wide/ 5.5 in tall for the Huskies and 6.75 in wide/ 5.5 in tall for the Kooiker.  There is room for downsizing a bit.

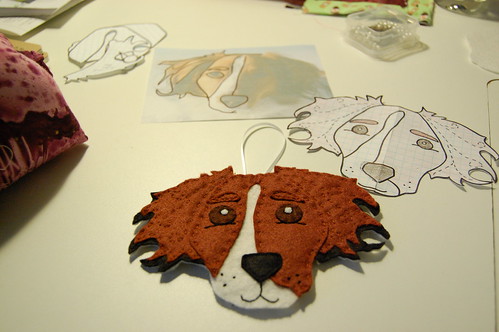
This over simplifies the creative process of how a picture is turned into an ornament.  I don't use computer software to help create a vector image, instead I take the basic shapes and markings of each dog and create the pattern.  It is time consuming and often times frustrating.  But doing it this way has lent a distinct style to my work which I think is satisfying.  I can look at my sewing and say that's mine, I did that, no one else can make that how I do.
1-2-3

What you don't see are the 11 other sketches crumpled up in the trash bin, the eraser dust, the messed up tracings of the markings and the scattering of felt bits that litter the workspace and floor.  If anyone ever said "art" was a clean process, they were never creating art to begin with.

Monday, March 5, 2012

Dem Worms, Dem Worms, Dem Good Worms

I've had a worm composting bin for nearly two years.  Since the husband isn't too keen on keeping a giant compost pile in our suburban yard (yet) I decided a small composting setup would be the best way to get him used to the idea.

I use a stacking worm composting bin.  Each tray has tiny holes to allow both the worms, water, and air to pass thru freely.  They're small enough that the finished "dirt" won't spill out entirely.  As one tray finishes I can rotate the trays to keep the working tray near the top and the finishing trays near the bottom.  Though once a tray is finished I move it to the top to dry out a little before I move the dirt to storage.

Worm composting bin

Worm composting is often faster at breaking down food scraps than an outdoor compost setup.  Though established outdoor setups can process much larger quantities of food and yard waste at one time.  I eventually want to have both types going.

Worm "dirt"

You can see the eggshells haven't quite broken all the way down but that's okay.  Eggshells can add beneficial calcium back to the soil and to the plants the "dirt" is spread around or planted with. Good worm "dirt" should smell earthy and clean. It should be relatively dry and have a crumbly texture.  If it smells a bit off then it's definitely not done composting or there's an imbalance (too much food added at one time, too much mositure or you have meat/dairy products in there which is a big no-no)

Worm Tea

Because the composting process requires a little water to keep things lightly moist/damp (not soaking) as the water trickles down thru the stacked bins the lower level collects it.  I can then harvest the concentrated worm tea via a small spicket at the bottom.  I like to dilute this just a bit more and water in new plants or use it in it's concentrated form for an extra dose of fertilizer.

If you're new to composting I encourage you to read up on it.  It does take some trial and error (a learning period) but once you've got it down it's very easy to maintain and offers a great benefit to any garden, yard or flower bed.

Friday, March 2, 2012

The Chain Gang Sewing Tip

Alot of times while working on a quilt you'll find yourself piecing and sewing together the same type of  block combination over and over...and over. It can become quite tedious and boring.
To help speed it along you can "chain" your blocks together!
Chained Pieces

Chaining blocks is exactly like it sounds.  As you finish sewing the piece you were working on simply sew a couple of stitches out from the end of the last piece (don't worry it won't hurt your machine) and then add the next identical block combination and sew that one together, so on and so forth.  There is no need to stop the machine and cut threads for each tiny piece.  You can see in the picture above that there is a space between each block and each block is connected with thread thus chaining them together.

Once you finish sewing the all the identical block pieces together you'll be left with something that resembles a wonky kind of bunting.  Lay your sewn pieces flat and cut the thread between each block piece.  Presto!  You've sewn several bits of fabric together much faster with less fuss.  Plus it's kind of fun especially when your blocks start to get bigger.

You can see in this picture that I still needed to add another piece to the other side.  I did the same thing with these and chained them together, and then cut the extra thread between each piece when they were all done .

Chaining the other side

Here's a video to help you visualize it (I personally do not recommend sewing over your needles and no that is not me ^_~):

Related Posts Plugin for WordPress, Blogger...